在一些案例中硬盘有一个或者多个的磁头出现故障,但是硬盘依然可以正常初始。但是当我们尝试访问用户区时硬盘提示错误,无法访问用户扇区。
In some cases a drive with one or more malfunctioning heads can finish the initialization process without any visible errors. But when we try to read user area it results in error and no user data can be read. For example it can occur when one or more heads have problems with writing.
当至少一个系统磁头是好的情况下 ,我们通过以下操作流程访问用户数据
The procedure allows to get access to data on all normally working heads of the drive when SA and at least one of system heads are OK.
该方法的主要思路是用一个好的磁头替代有故障的磁头
The main idea of this method is to to trick the drive calibration procedure through substitution of a normal head instead of a malfunctioning one. Consequently it works with drives using two or more heads.
关于系统磁头损坏的情况下的数据访问方法 将在下一篇文章中讲解
Also it can be applicable when one of the system heads is damaged. In such cases the patient drive may produce clicks, knocks and turn down the spindle. This case will be reviewed in details in the next article.

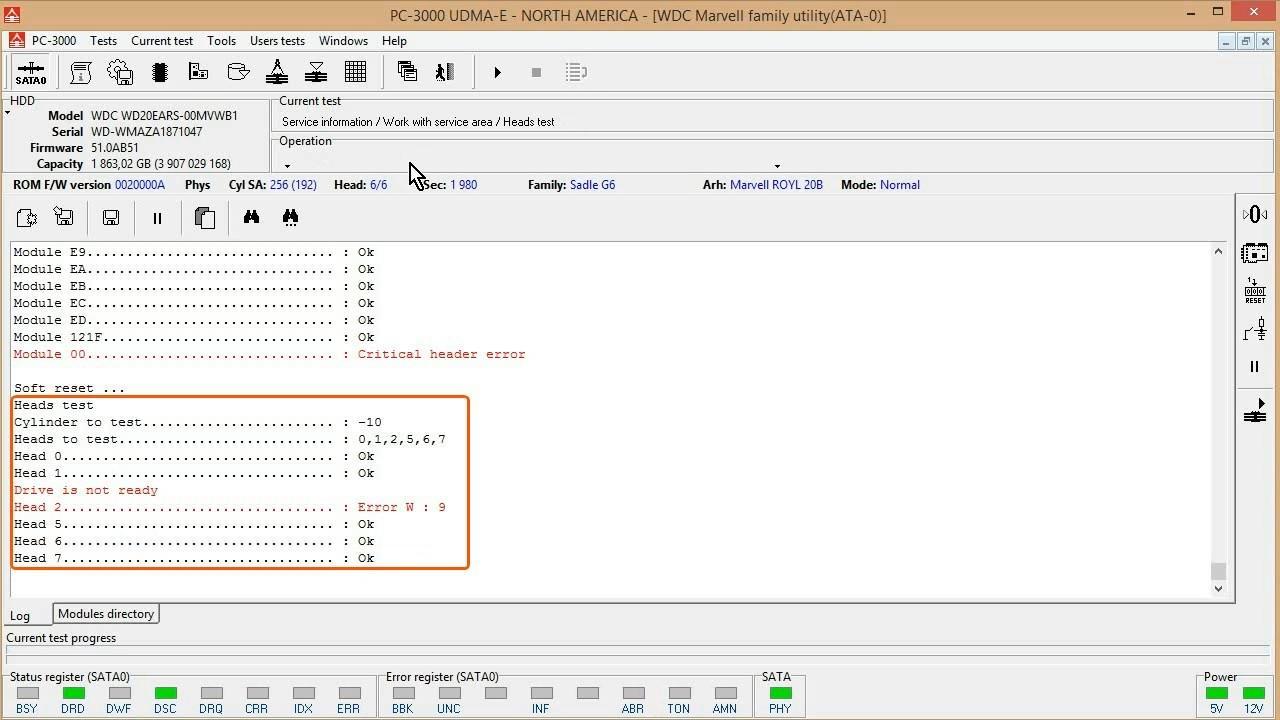
本案例中 我们将恢复 WD20EARS-00MVWB0 硬盘的数据(系统磁头良好)。硬盘可以就绪但无法访问用户区,我们在正常模式下进行以下操作。
In this example we recover WD20EARS-00MVWB0 drive with non-system head damaged. The drive goes READY but do not give access to its User Area. So we use the procedure in Normal mode.
Here the procedure:
启动硬盘 ,等到硬盘就绪
We turn the drive ON and wait until it goes READY

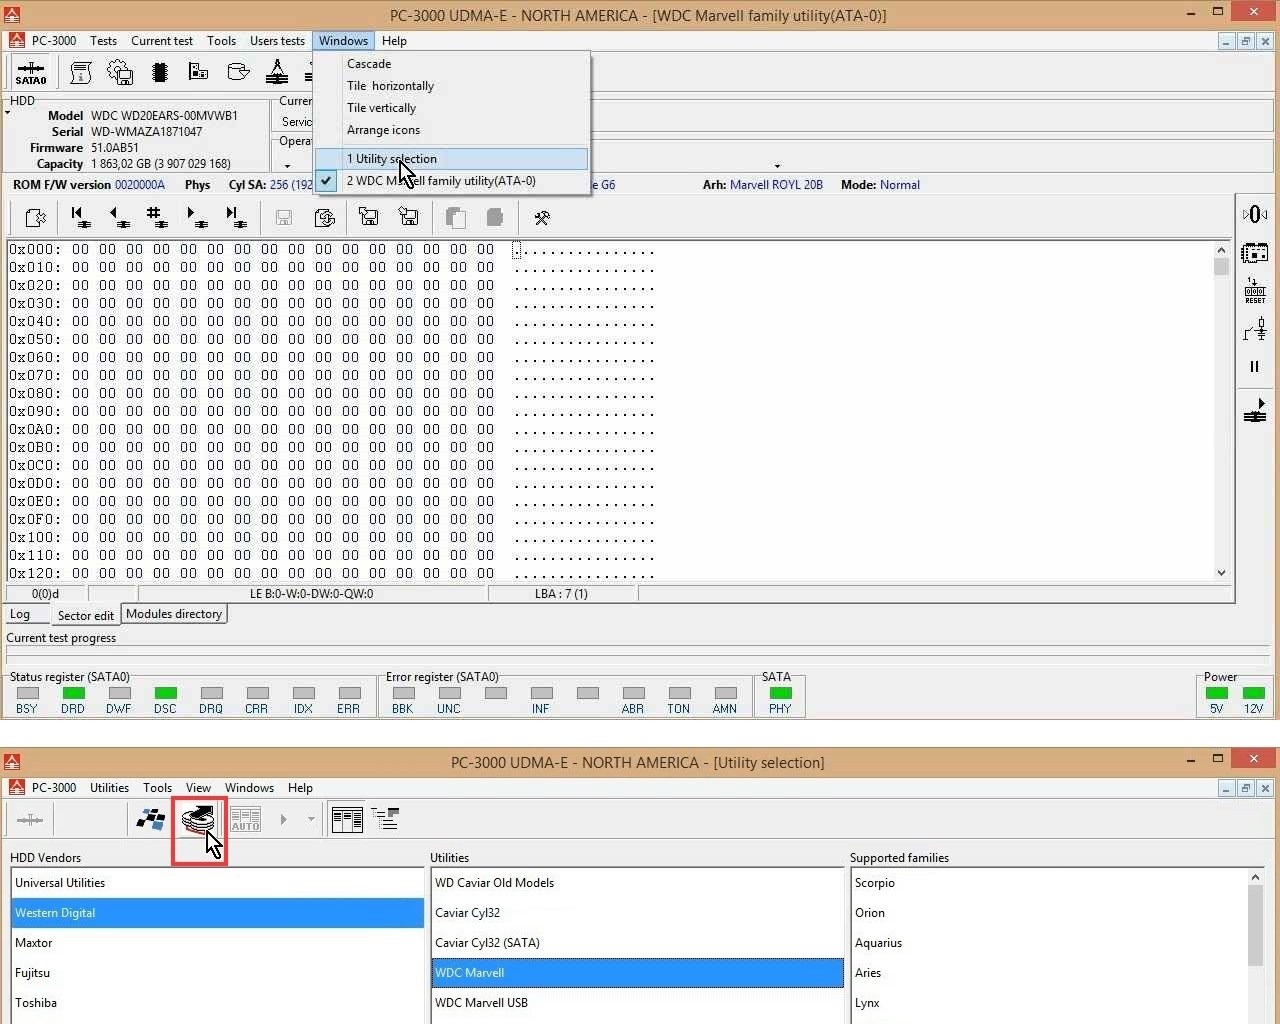
点Utility Autodetect 按钮 进入实用程序
Then press the Utility Autodetect button and double-click the utility

点Autodetect 按钮 自动发现硬盘家族 启动实用程序
Now press Autodetect button and check that Mode and Drive Family are chosen correctly and press the Utility Start button

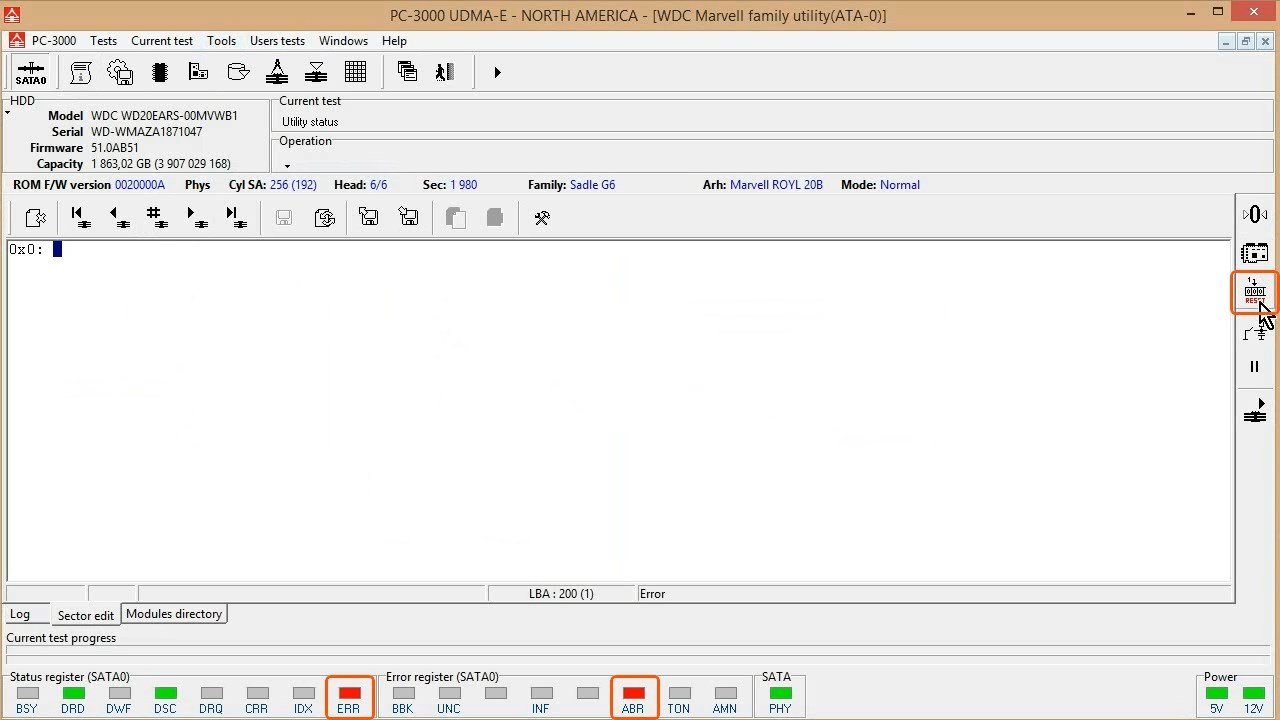
硬盘初始化正常,没有报错,SA 区可以访问,硬盘ID 正确
As we can see the drive initialized without any errors, SA is accessible and drive ID is correct

在这里我们可以看到硬盘共有六个磁头 ,都处于工作状态
Also here we can see that the drive has 6 heads and all of them are ON

用Sector Edit 菜单 检测用户区是否可以访问
To check that the User Area is accessible we can use Sector Edit tool.

在这里我们发现无法访问用户区,程序报错
As we can see here we do not have access to the User Area and drive returns ERROR status

现在进行一次软复位 ,让硬盘复位
Now I give a Soft Reset command to the drive to set it in Ready status
等待硬盘再次 就绪
And wait until it becomes ready again

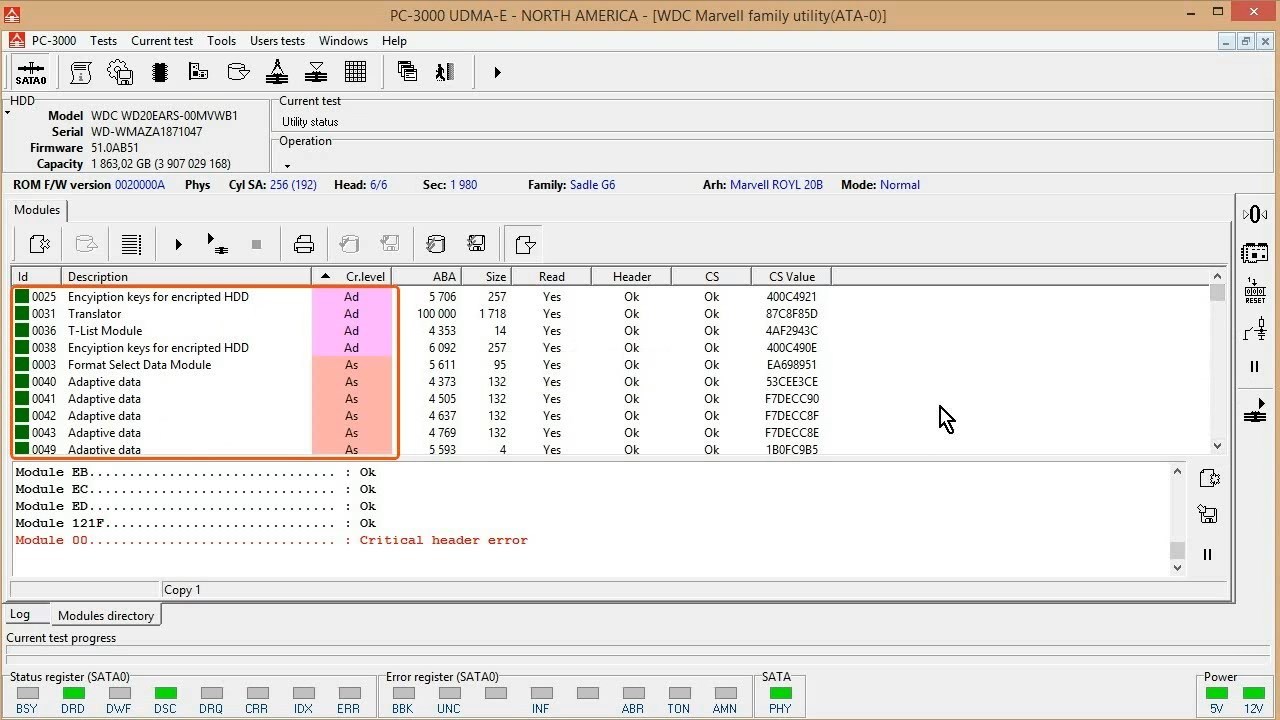
现在我们需要检测SA模块, 以确认用户区无法访问的原因是否与SA模块有关
Now we need to check the SA modules to be sure that problem is not in them
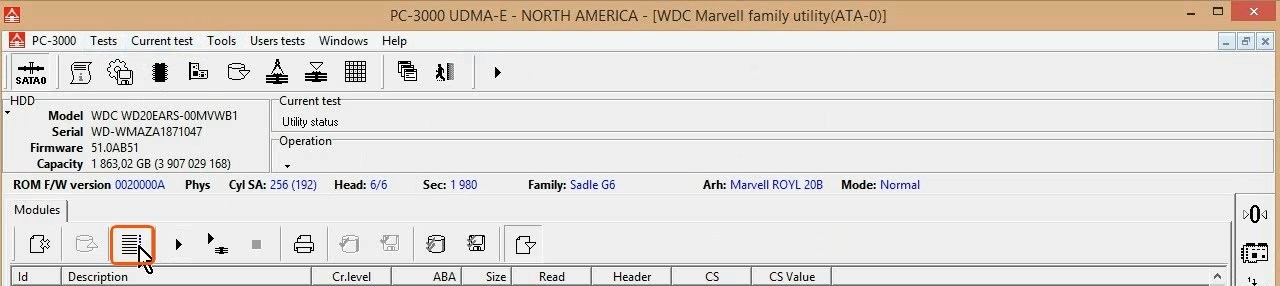
工具 Tools -> Utility extensions实用程序 扩展-> Modules directory模块目录
To do that go to Tools -> Utility extensions -> Modules directory

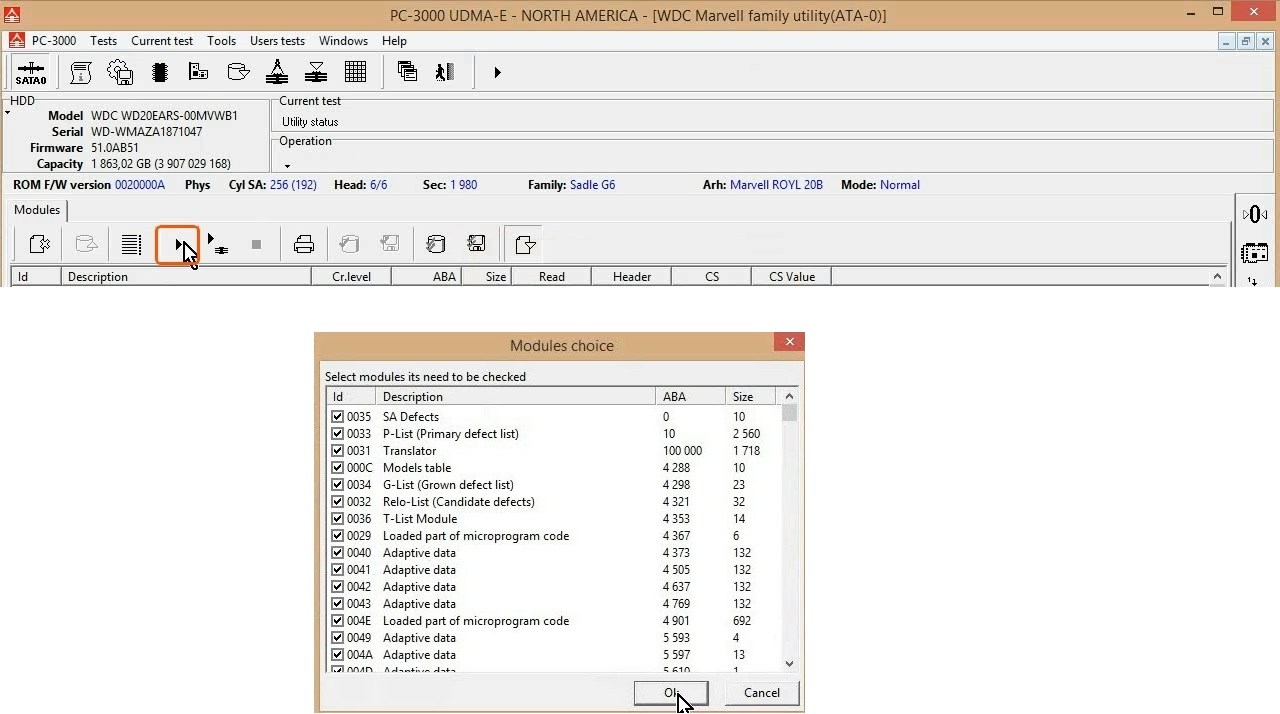
然后按选择模块读取方式按钮
Then press Select Modules Reading Method button
并选择ABA 读取Copy0
and select Read by ABA Copy 0

然后按SA检查按钮
Then press SA checking button
检查所有模块是否被选中,然后按OK
Check that all modules are selected and press OK
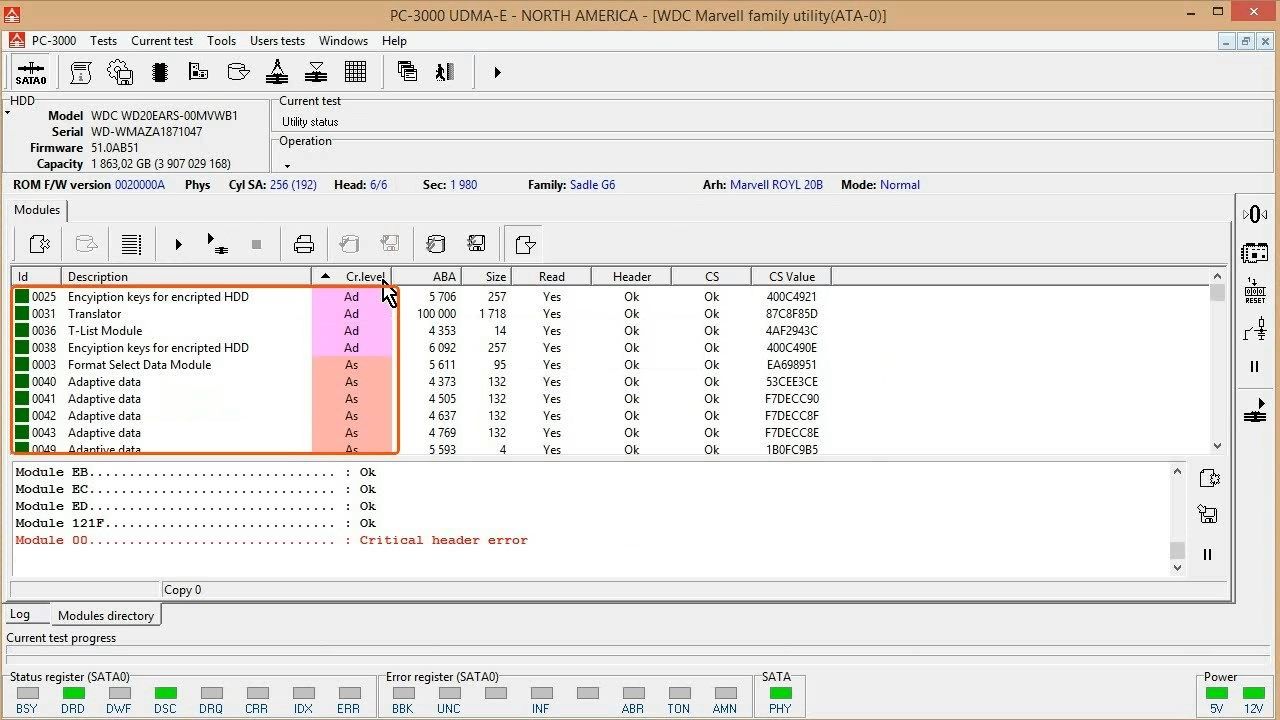
检查完成后,我们来看看结果
When the checking is completed we look at the results
我们可以看到,所有关键模块(A类和B类)都是正确的
As we can see here all the critical modules (A and B category) are correct
(not all the modules are shown on the picture)
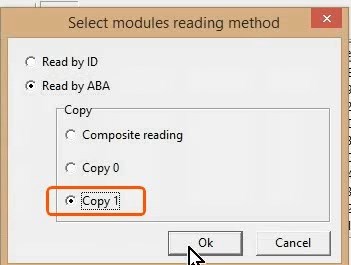
所以现在我们检查Copy 1模块
So now we check the Copy 1 modules.
再次按选择模块读取方式按钮,现在检查copy1。然后按OK。
Press Select Modules Reading Method button again and now check Copy 1 box. Then press OK.
再次按SA检查按钮,检查所有模块是否被选中,然后按OK
Again press the SA checking button, check that all modules are selected and press OK

我们可以看到Copy 1的模块也正常的,所以应该不是模块引起的问题
We can see that Copy 1 of modules is also OK so the problem is not in the modules
(not all the modules are shown on the picture)
问题不在SA模块中。所以我们需要检查磁头。
The problem is not in SA modules. So we need to check the heads.
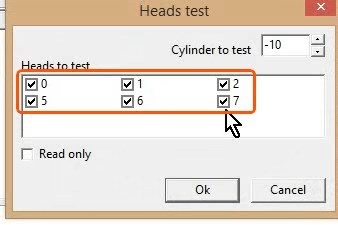
我们必须找出哪些磁头损坏了,所以让我们进行磁头测试。
We have to find out which of the heads are damaged so let’s run the Head test.
点击Tests -> Service information -> Work with service area -> Heads test
To do that we go Tests -> Service information -> Work with service area -> Heads test

在这里,我们可以看到硬盘的6个磁头。我们来检查所有磁头。然后按OK。
Here we can see all 6 heads of the drive. Let’s Check all of them. Then press OK.
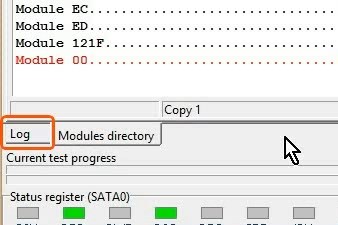
选择日志选项卡以查看进程
Choose the Log tab to see the process
这里我们可以看到测试结果
Here we can see the test results

在这里我们可以看到正在测试哪个磁头和测试阶段。
And here we can see which head is being tested and stage of the test.
在头部测试的第一阶段,它将特定的数据写到盘片上的特殊位置
On the first stage of the head test it writes the specific pattern to the special place on the platter

在测试的第二阶段,磁头读取数据并检查它与写入是否匹配
And on the second stage of the test the head reads data and checks that it matches with the pattern

这里我们看到结果:磁头0是正常的
Here we see the result: Head 0 is OK

磁头1是也正常的
Head 1 is also OK
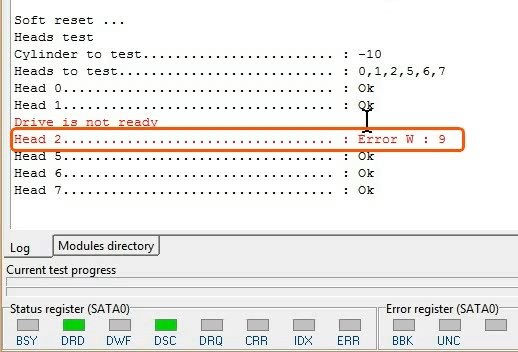
但是在这里我们可以看到磁头2写出现问题
But here we can see problems with writing on Head 2
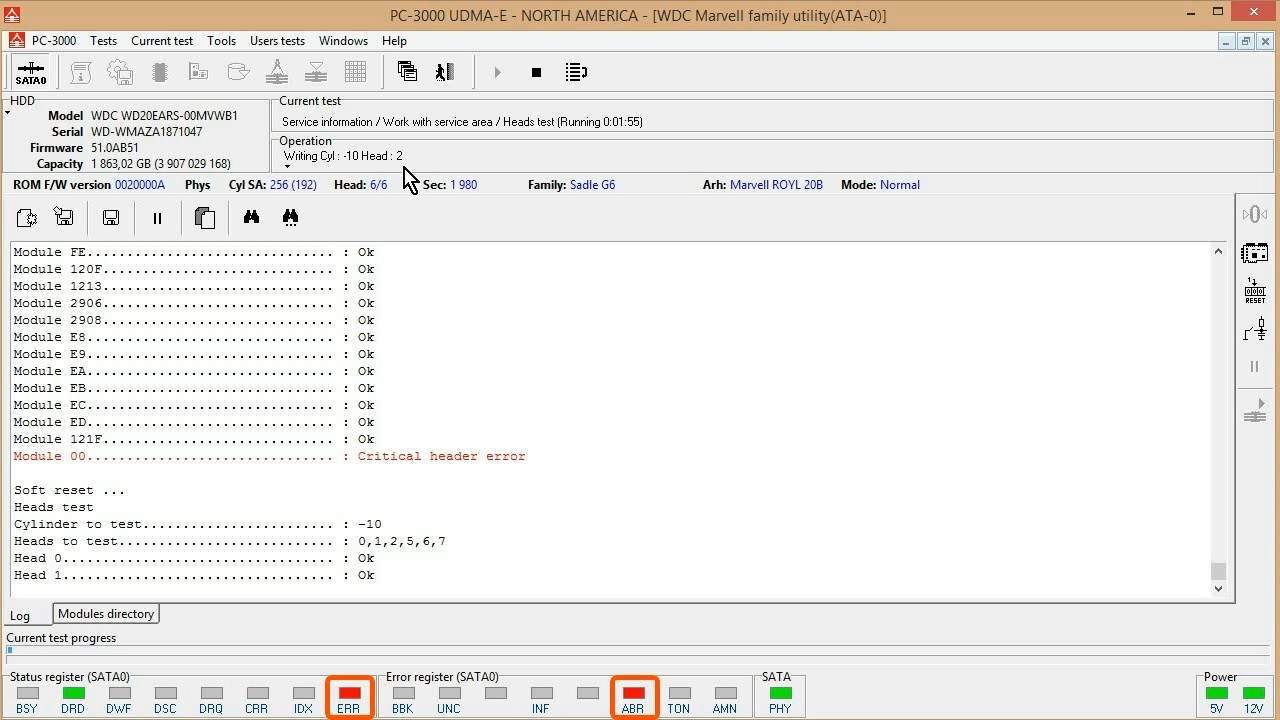
它显示为ERR和ABR信号灯的闪烁,之后BSY信号灯常亮几秒钟
It appears as blinking of ERR and ABR flags and right after that the BSY flag stays ON for few seconds

一旦我们发现当前的磁头部写入(或读到)有问题,我们可以按“跳过”按钮来检查其他磁头
Once we understood that current head has problems with writing (or reading) we can push Skip button to check other heads

跳过后我们在日志里可以看到 磁头2 是写入有问题的
Right after skipping the head we see the result in log: Head 2 has writing problems
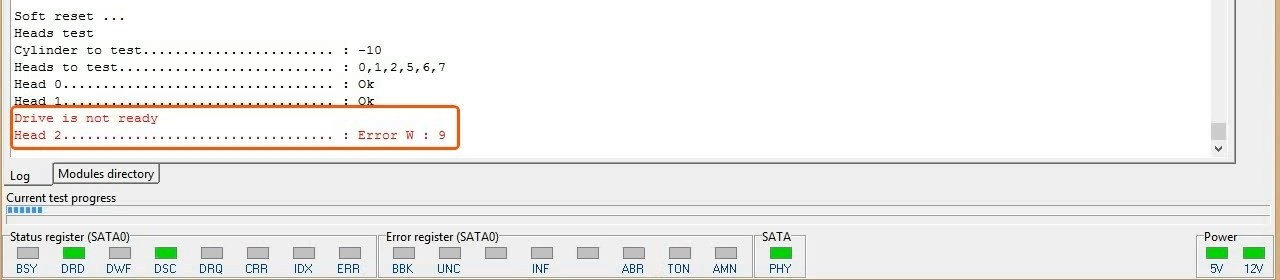
磁头5,6和7已成功通过检查。
Heads 5, 6 and 7 has successfully passed the checking.
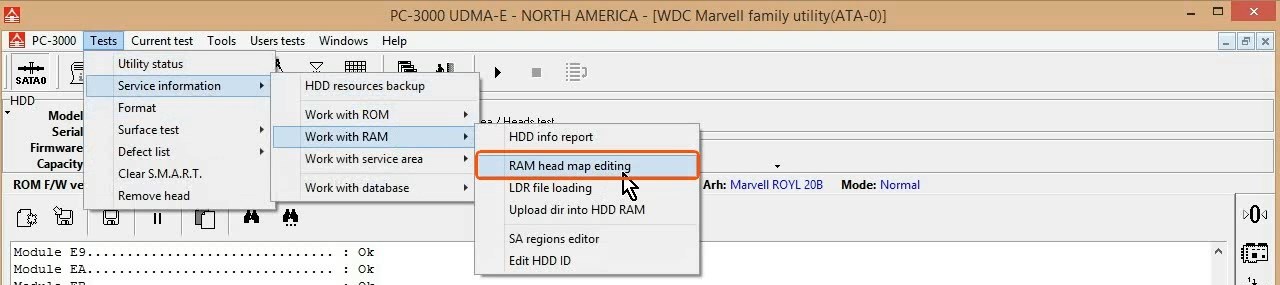
所以磁头检测的结果是2头坏了 其他磁头是好的,我们需要在RAM 磁头位图里用其他好的磁头来替代损坏的2头
So only Head 2 malfunctioned and it needs to be spared in RAM with other good working head
点击Tests -> Service information -> Work with RAM -> RAM head map editing
To do that we go to Tests -> Service information -> Work with RAM -> RAM head map editing
如果您在此步骤中收到错误消息,那么您应该尝试手动将Loader上传到RAM中。
If you get an Error message on this step then you should try to manually upload Loader into RAM.
现在我们可以看到 RAM 里面的磁头位图了
Here we see our current head map in RAM.
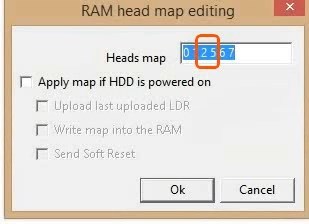
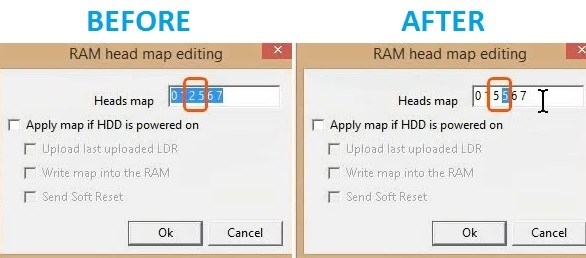
在这里我们用一个其他的磁头号来代替损坏的磁头2 ,用于替代的磁头号是任意的(可以是2之外的任意一个, 在这里我们选用磁头5)
To spare your malfunctioning Head 2 we have to replace its number in map with number of any working head and press OK. In this example I choose Head 5
现在我们尝试使用扇区编辑工具访问用户区
Now we try to get access to User Area using Sector Edit tool

看来运气不太好
And no luck again
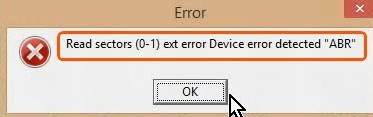
修改完后忘了点软复位,所以导致访问扇区出错
It occurred because I forgot to give Soft Reset command to the drive.
进行软复位
So let’s press the Soft Reset button
等到驱动器就绪
Wait until the drive is Ready

并再次运行扇区编辑工具。
And run Sector Edit tool again.
经过软复位后,我们可以访问扇区了 ,意味着用户区可以访问
Now it worked! We can see the data in the sector. So now we can read User Area.
所以现在我们可以切换到Utility Selection窗口并运行Data Extractor。不要关闭西数专修程序!
So now we can switch to the Utility Selection window and run Data Extractor. DO NOT CLOSE THE WD UTILITY NOW!!!
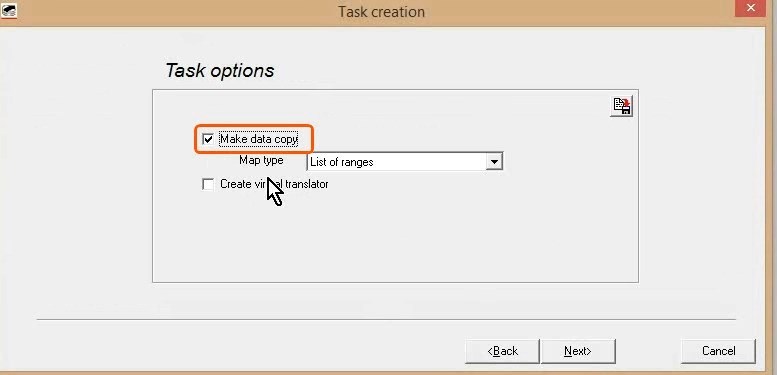
现在我们创建一个新任务
Now we create a new task

选中Make Data copy选项
with Make data copy option checked
建立磁头位图通过 Service menu -> Build heads map
To build a new head map we go to Service menu -> Build heads map
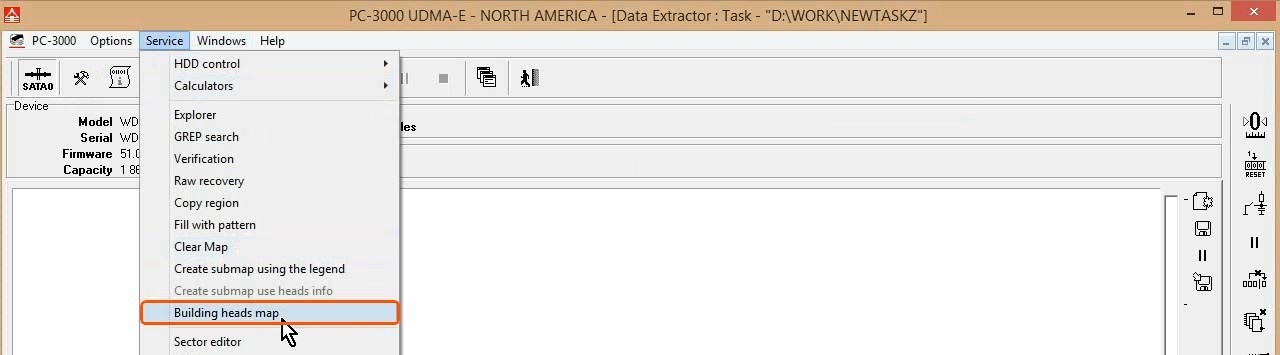
我们需要所有LBA磁头位图,所以只需按应用按钮
We need head map for the whole LBA space so just press Apply button

这里我们可以看到,磁头位图构建的过程已经完成
Here we can see that the process of heads map building is completed

我们可以去任务参数进行调整
And we can go to Task params to make adjustments

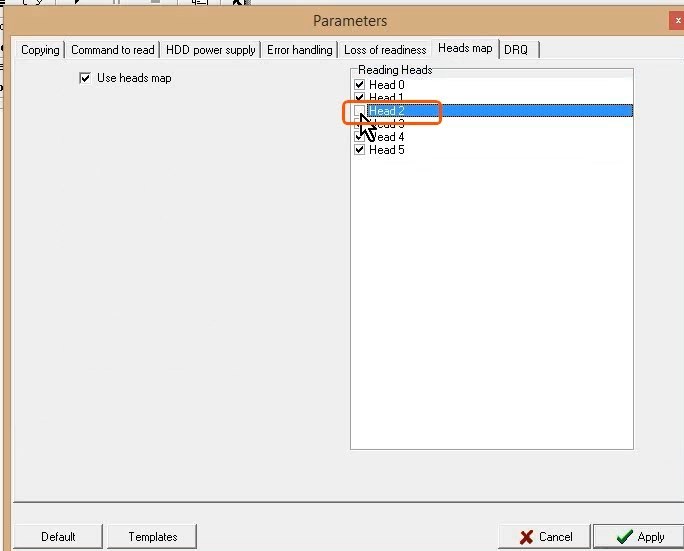
选择Heads map标签
Now we go to Heads map tab
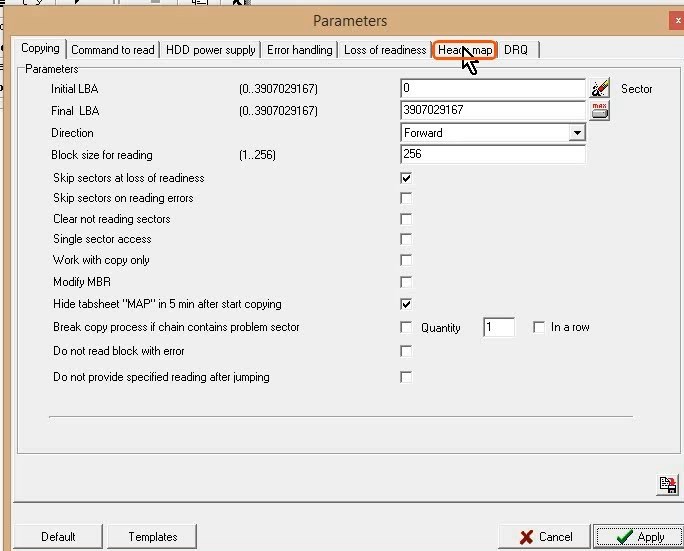
我看到了所有磁头,选中的将用于读取数据
Here we see the heads. Those which are checked will be used for drive image reading

取消选中故障磁头2。
Uncheck malfunctioning head 2.
要特别注意这里的逻辑磁头号(0,1,2,3,4,5),但在WD实用程序中,我们使用的是物理头数(0,1,2,5,6,7)。所以你不应该记住数字,而是记住磁头的位置
Pay special attention to the fact that heads here have logical numbers(0,1,2,3,4,5) but in the WD utility we worked with physical heads numbers(0,1,2,5,6,7). So you should remember not the number but the position of the head in stack
现在我们可以从选中工作的磁头开始读取硬盘的镜像
Now we can start reading the image of the disk from working heads

故障磁头的数据只有在我们更换整个磁头后才可以获得。但它是下一篇文章的主题。
The data from the malfunctioned Head we can get only if we replace the whole head stack. But it is a topic for one of the next articles.
转载请注明:成都千喜数据恢复中心 » 使用PC-3000 for HDD在RAM中编辑西数硬盘的磁头位图,虚拟磁头恢复西数硬盘数据